5 Easy Steps to Create Your Own Amazon Teacher Wishlist

I believe that every teacher should create an Amazon Teacher Wishlist. The sad truth is that many exceptional teachers do excellent work but wish they had more resources to increase the class learning, cleanliness, and engagement. Most of the time, parents really want to help teachers, but they don’t know where to start. Having a teacher amazon wishlist makes it easy
You might start the year with a ton of hand sanitizer, clorox wipes, and kleenex but as the year goes on how many teachers are letting their parents know what else they need in the classroom? A lot of generous parents want to help out, but is there ever a non-pushy way to ask for classroom supplies in the middle of the year?
What if I told you there’s a way to have an up to date list of your class needs AND a way to make it simple and cheap for parents to meet those needs? Luckily Amazon once again shows why they’re one of the best companies in the world! I’m going to show you how you can create your own Amazon teacher wishlist in 5 easy steps!
Step 1: Create an Amazon Account
While most people have an Amazon account now a days, I wanted to make sure I was very thorough and helped as many teachers as I could. If you have an Amazon account – Hooray! You’re already living the dream! If you don’t have an Amazon account you can sign up for a free 30 day Amazon Prime Trial. I could write hundreds and hundreds of blogs about all the benefits of Amazon Prime (especially for a teacher) but I’ll save us both some time. Either way, the good news is you don’t even have to have a Prime account to use the benefits of the Amazon Teacher Wishlist.
Step 2: Create a Wishlist
Once you are signed into your Amazon account hover over “Accounts and Lists” in the top right of the Amazon Banner at the top of the page. You’ll see a drop down menu with a TON of options!

Next you’ll want to click on “Create a List” about half way down on the left hand side. Once you click “Create a List” you’re able to name it. Choose a name that will easily identify it with you or your classroom because you will later be sharing this list with other people. (If you make a mistake, you can always change the name in the next step.

Step 3: Set Up Settings Of Your Wishlist
Next you’re going to want to format the correct settings for your list so that it can be shared, and so that the items that are bought are sent directly to your house. Click on the three horizontal lines and click on “manage list”.
After clicking on “manage list” you’ll have a lot of important options. First you will want to change the wishlist from private to either “shared” or “public” so that you can send it to others. Secondly, you can write a short description of what the list is for. Next, insert your shipping address. If you already have an address on file this step will be very easy. (Note: Your actual shipping address will not be given to the people viewing your wishlist. They will only see your name, the city and the state of your address).


At the end you will see two options to check: “Keep purchased items on list” and “Don’t Spoil my Surprises”. If you select Keep purchased items on list, It will keep all the items on your list even if someone purchases it. This is a great option if you’re planning on using the list only for consumables like paper towels or hand sanitizer. If you select Don’t spoil my surprises, your purchased products will stay on the list until the item has been delivered. If someone has already purchased an item and you try to purchase the same item from your list you will receive a warning about purchasing a duplicate item.
Step 4: Adding Items to your Wishlist
Now that your list is set up, you are ready to go shopping for all the things that will enhance your classroom! First find any item that you want to add to the list. In the same box that you would normally add the item to your own cart, use the drop down menu to add it to your list. It really is that simple!

Step 5: Sharing the List
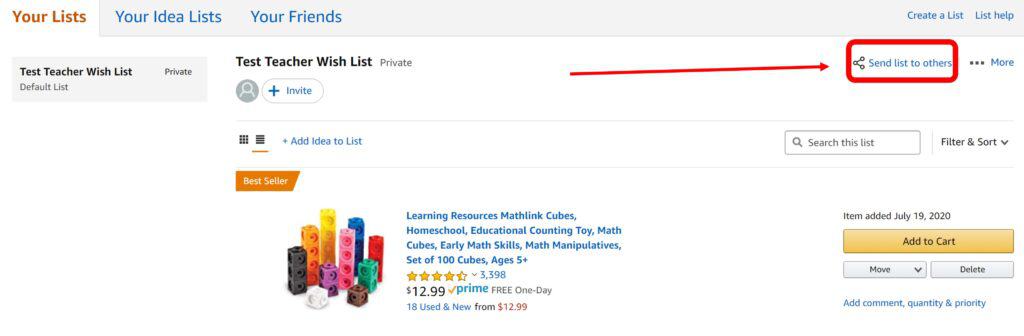
Okay so now you have your list all together and are ready to share it. You have a lot of options for great ways to make your list known. I think you’ll be surprised by how many generous advocates would love to make your Amazon Teacher Wishlist a reality. You will have the option to share your list through a direct link or through e-mail. Both options are incredibly easy!
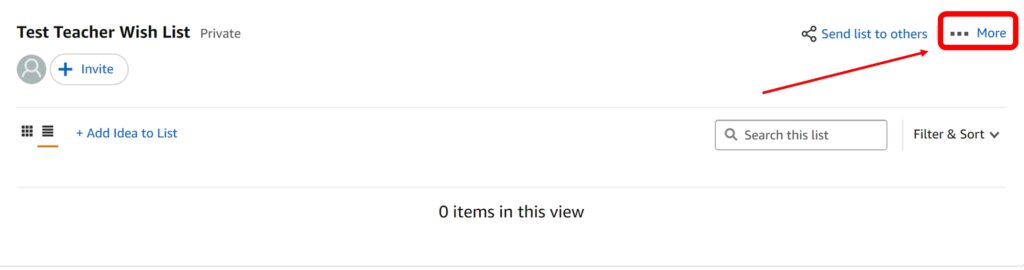
Step 1: Go to your list and click on “send list to others”. (If you haven’t already changed
your privacy setting to “Shared” it will automatically do it when you share your list)
Step 2: Choose whether you want to invite someone to “View Only” or “View and Edit”. If
you’re sending it to parents or friends choose “view only”. “View and Edit” would be a great
option if you are going to have an Amazon Teacher Wishlist for your PLC, or for your
school. Each member that you allow to view and edit can add items as they are needed.

Step 3: Choose if you want to copy the link or invite people by e-mail.

Conclusion – Set Up Your Amazon Teacher Wishlist Today!
I hope that this tutorial gave you the confidence to create your dream Amazon Teacher Wishlist to get everything you need for your students to thrive! If you’re looking for inspiration for your own teacher wishlist, check out my Amazon List. I’ve got all my favorite products for setting up and decorating a classroom!
Comment below to let me know what you are going to add to your Amazon Teacher Wishlist!


Get ALL the Freebies.
Sign up to get access to exclusive freebies for your classroom. New items added all the time!
I already have the password.